Recording and editing audio files is an important part of any audio production project. However, when working with different audio files or recordings, you may find that certain sections of your audio are louder or softer than others. This is where the normalization process comes in, allowing you to adjust the levels of your audio and make the quieter parts more audible.
What is normalization?
Normalization is the process of adjusting the levels of an audio file to a specific level, usually to make the quieter parts of the audio more audible. When you normalize audio, you are essentially increasing the volume of the audio file while keeping the overall sound quality intact. Here is an example to better understand the normalization process:
You have an audio file that has a loud peak at 70% and a quiet peak at 25%. After normalizing to 100%, the loud peak will be at 100% and the quiet peak will be at 55%. That is, the normalize effect amplifies the entire audio.
What is it needed for?
The normalization process is essential for ensuring that your audio is clear and audible throughout the entire file. When working with different audio files or recordings, you may find that some sections are louder than others, which can make it difficult to hear the quieter parts of the audio. Normalizing helps to balance out the levels of the audio file, making it easier to hear all of the audio content. This is particularly important when working on a multitrack project, where different audio files need to be mixed into one file.
It is important to note that normalization is not meant to create a standard level from start to finish, but rather to make sure that the quieter parts are audible enough.
How to normalize audio in Adobe Audition CC
Step 1: Select the section that you want to normalize
You can select the entire file or just a specific section. To select the entire file, use the combination “control+A” (windows) or “command+A” (mac). If you want to select a specific area it is necessary to highlight the part using the mouse that will be normalized.

Step 2: Click on the “Effects” option
It is located in the upper part of the working window in the menu tab.

Step 3: Choose “Normalize (Process)…”
In the drop-down list that appears, select the “Amplitude and Compression” option, and next click “Normalize (Process)…“.
Step 4: Configure the parameters
In the pop-up window there will be three options for adjusting the normalization: Normalize To, Normalize All Channels Equally, and DC Bias Adjust.

Normalize To – section, when you can adjust the level of the audio file by either a percentage or in dB (if you want to adjust the percentage, click on the circle next to the percentage sign, if you want to adjust the dB – the circle dB). I recommend using a normalization percentage (especially if you are a beginner) in the 83-89% range.
Normalize All Channels Equally – if checked, normalization will be applied equally to the left and right channels. If not, then separate for each channel.
If this option is not selected, the value is calculated separately for each channel, which could potentially significantly boost one of them than the others.
If you rec the sound to the recorder or microphone and the object was standing on the side of it, then the sound level in the left and right channels will be different. In this case you should selected this option. If you not selected, one channel may be boosted more than other.
DC Bias Adjust – you can modify the position of the waveform on the wave display. To bring it to the center, set the percentage to zero. To shift the selected waveform above or below the center line, specify a positive or negative percentage.
Recording equipment can sometimes create a DC bias, resulting in a waveform that seems to be either higher or lower than the standard center line on the wave display.
Step 5: To apply the normalization click “OK”
And that’s all. The work is done!
Usually, normalization is used in combination with other effects when processing audio. Therefore, I recommend using normalization not at 100% to leave some space in the loud peaks. Otherwise, the sound may overload.
Method for “lazy” or “quick method”
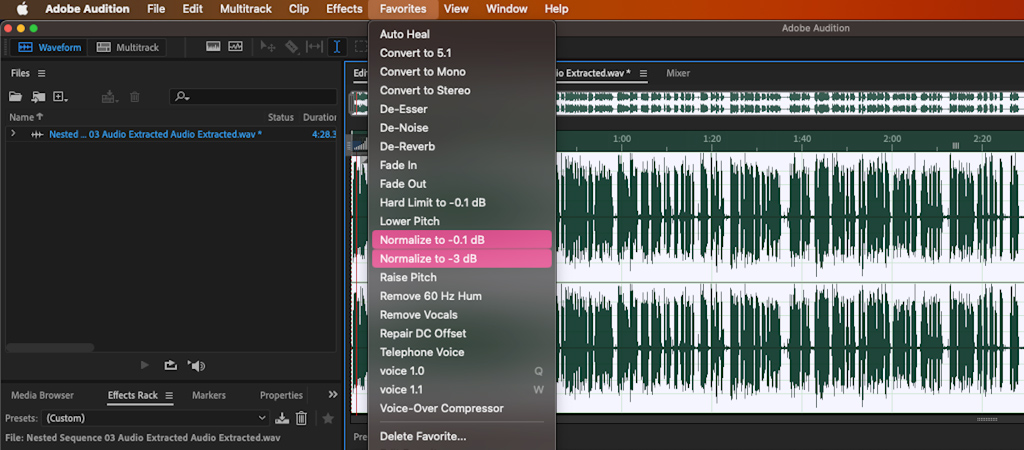
If there are no too-quiet or too-loud areas in the audio file, then you can use ready-made normalization settings. There are two of them: to -0.1 dB or -3 dB. They are located in the “Favorites” tab in the top menu. Choose the one that suits you better.
Troubleshooting Common Issues
When normalizing your audio, you may experience an issue where the effect does not work correctly. There can be several reasons. Here are the two most common.
Two people speak at different volumes
For example, imagine that you are editing a podcast (previously, I wrote about streamlining work on podcasts). The audio is recorded in one file. We do not have two separate audio files for each person. And here is the problem – one person speaks louder than the other. Normalization works, but not perfectly.

To fix the issue of two people speaking at different volumes, you can either adjust the volume manually (if you have the time and desire) or apply effects, such as Dynamics, to handle it automatically.
Background noise in the audio
It happens that during recording, something hit the microphone, or an extraneous sound was captured. During normalization, you may notice that this sound interferes with the effect working properly.

To fix this issue during normalization, you should remove background noise. You can either cut a small part of the audio file (which will slightly reduce its duration) or remove the loud noise while preserving the full audio. Here are two approaches to address it:
- – Adjust Amplitude;
- – Spot Healing Brush Tool.
Conclusion
When you normalize audio, it amplifies the quieter sounds, making them easier to hear. It helps to ensure that the quieter parts of the audio file are audible while maintaining the overall sound quality. It also adjusts the volume of the louder parts so that they don’t become distorted.
I just recently started learning video editing, so don’t laugh pls.
I can’t normalize audio with fades. Is it possible and any options how to do this?
Audio normalization should be applied before any fades are added. But if you already have audio with fades, I recommend using the “Normalize (process)” effect. After that, unwanted noise may appear in areas where there are fades, and this will be the main problem. If it can be removed without problems (by removing background noises), this will be your solution. If not, you should first normalize the audio and then add fades.
Good luck with your projects!
hmm, I followed these steps in my Audition, but the volume is still way too low… I selected the right sections and set the parameters but it didn’t really boost the sound
Please help
I sent the files to the mail in the contacts section. Can you take a look please? The email title is “low volume audition”
Thanks for your comment! I replied to your email, so let me know if it works for you. For others, here’s a summary:
In your case the problem is the fragment where you can hear the loud knock right on the microphone. Abnormally loud sounds significantly above the average volume make normalization quite an impossible.
To fix this, trim or remove the loud section with the Spot Healing Brush Tool. If you do this, the normalization should work properly.
Such nuances would be a great topic for a next article. I will add it to my notebook 🙂