If you are an experienced video editor, you know that our work includes not only the processing of video but also audio materials. If you are a newbie, then congratulations, now you know this too!
Sometimes addition video, the client also needs to export a separate audio file. Most often is a recording of an interview or a podcast that needs to be distributed to different audio platforms. And for such cases, you need to know how to export only audio in Premiere Pro.
It is very easy to do! Every video editor can do it!
How to export only the audio file in Premiere Pro
Step 1: Select the audio you want to export
There are two ways to do it.
First: turn off all audio files that do not need to be exported. To do this, in the left corner of the timeline, click on the “M” on all the tracks that you want to turn off. Alternatively, select “S” on the tracks you want to export.
This method can be used if you have many audio tracks and you only need to export one or two of them.
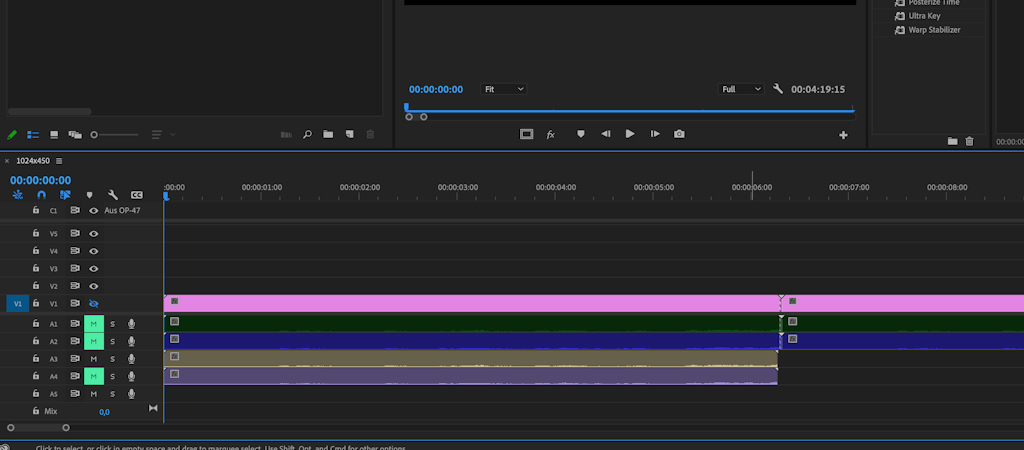
Second: drag the audio file you want to export. This option is suitable when you only need to export part of the audio in the track. To do this, hold down the ALT (windows) or option (mac) button and drag the audio file toward the timeline. In this way, you duplicate this audio file and after exporting you can easily delete it.
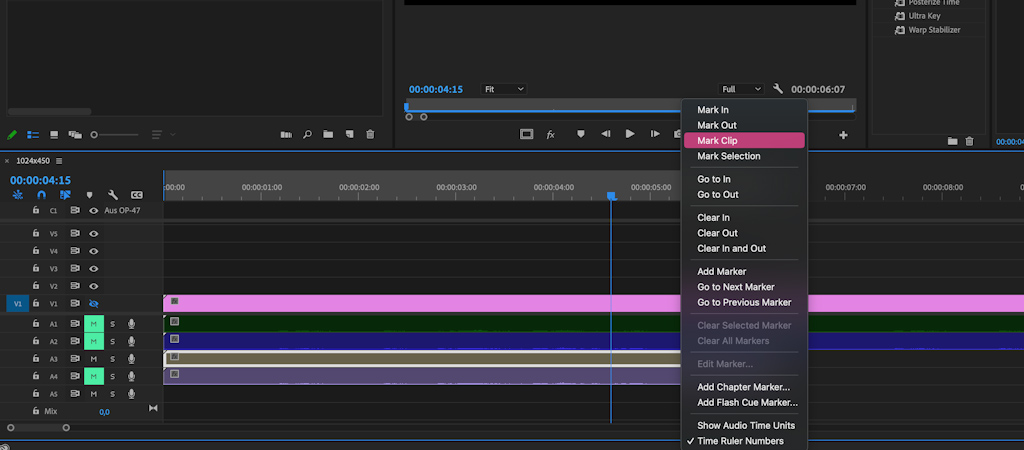
Step 2: Set the export range
If you want to export only part of your audio clip, use “Mark In” and “Mark Out” on the timeline. If you want to export the entire clip, select “Mark Clip” to include everything. Just right-click on the top of your timeline.
Step 3: Choose the audio format
To bring up the export window go to the “File” menu on the top left corner of the interface, then click on “Export“, and finally choose “Media“. Alternatively, you can use the keyboard shortcut Ctrl+M (Windows) or Command+M (Mac) to directly access the “Export” menu.

In the “Export Settings” dialog box, you will have to specify the format for your audio file. MP3 is usually chosen, but you can choose what you need (MP3, WAV, AAC, or others). To choose it, open the “Format” drop-down menu.
Step 4: Adjust the export settings
In additional settings, you can configure several functions:
- Mono or stereo channels for your audio file.
- Set the bitrate for your audio. The higher the bitrate, the higher the quality of the audio, but its weight will also increase.
- Select the Codec quality to indicate the priority you need: Fast or High.

If you use WAV or AAC format, in addition to bitrate, you can also set sample rate (usually 44.1kHz or 48kHz).
After all settings, don’t forget to check your export location and file name. Just click on the blue text to choose a file name and location.
Finally, click the “Export” button. And there you have it! You’ve successfully exported the audio file only in Adobe Premiere Pro.
Use Media Encoder
If you need to export only the audio from a completed video (for example, to create an audio version of a podcast), there’s a fast method to use Media Encoder.

Open Media Encoder, import your video file (MP4, MOV, or other), and choose the desired audio format. Then, click the green button (looks like “play”) in the top right corner and wait for the export to complete!
Conclusion
You no longer need additional programs and intermediate exports to get an audio-only file. Now you can do all this in the program in which you work.
For beginners, amateurs, or professionals, it is an integral part of work. Therefore, knowing and being able to export an audio file separately is necessary for the work of every video editor.